Antistasi Porting Maps
Intro
Intro
To be able to play Antistasi on a certain map, this map needs to be ported aka it needs to be implemented into the Antistasi code. This may sound fairly simple but it can be quite the opposite. This document has the purpose to give a rough overview over the map porting process. Nevertheless it has to be said that no map port is the same and there are always adjustments that need to be made as well as exceptions.
Map selection
Map selection
The first part of porting a map is to check if the map in question is reasonably close to the best-practice requirements. These requirements, which are a rule-of-thumb and based on experience, are as follows:
The map should be at least approx. 10x10km or have a landmass of approx. 80 - 100km²
The map should have a more or less connected road system – important for pathfinding
The map needs to have villages and cities, as having a civilian population is necessary for Antistasi
The markers of villages and cities needs to be configured correctly in CfgWorld-Name-Types
The map should ideally have at least one airfield
The map should be clutter-free aka post-apocalyptic maps are not desirable
First steps
First steps
navGrid.sqf.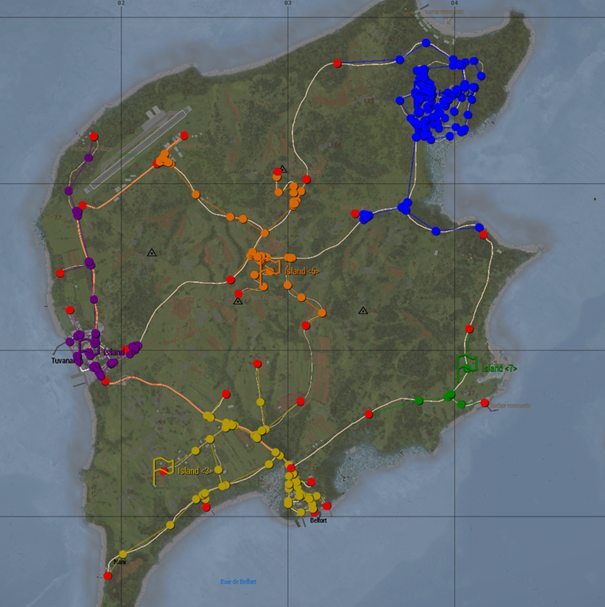
Antistasi_mapname.mapname. The mapname has to be exactly what the map is called when saved from the editor like for example chernarus_summer for Chernarus Summer, vt7 for Virolahti or vn_khe_sanh for Khe Sanh of the S.O.G. Prairie Fire CDLC. If the name is not exact, it won’t be recognized by the code. Below you for example can see the folder name as well as the files for Altis.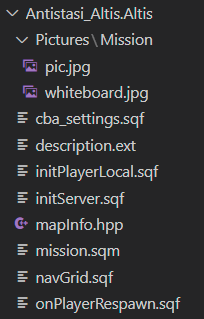
pic.jpg
This is the cover picture which also is visible when the campaign is loading. Should be 1080p.
whiteboard.jpg
This is the texture for the whiteboard. Needs to be 2048x2048px. Best is to take a different whiteboard.jpg and overlay the map part.
cba_settings.sqf
This file is needed for the system, no adjustments needed to be made.
description.ext
initPlayerLocal.sqf
This file is needed for the system, no adjustments needed to be made.
initServer.sqf
This file is needed for the system, no adjustments needed to be made.
mapInfo.hpp
The map info needs to be updated with the necessary data, once the mission.sqm has been completed. More info on that further below.
missions.sqm
The mission.sqm is the file that contains all the necessary markers as well as unit and asset placements from the Arma 3 Editor. More info on that further below.
navGrid.sqf
This file needs to contain the exported information from the Street Artist Tool.
onPlayerRespawn.sqf
This file is needed for the system, no adjustments needed to be made.
Setting up the mission.sqm
Setting up the mission.sqm
C:Users[Username]DocumentsArma 3 - Other Profiles[playername]compositions folder or wherever your profile is saved and unpack it.all necessary modules to run Antistasi including game logic, headless clients and the gamemaster module
all necessary HQ assets like the arsenal, the vehicle box, the tent and more
Petros as well as all payable units
marker for the support corridors
6 sets of airport markers
20 sets of outpost markers
10 sets of seaport markers
10 sets of factory markers
20 sets of resource markers
additional markers like detectPlayer, control, seaAttackSpawn, seapatrol and seaSpawn
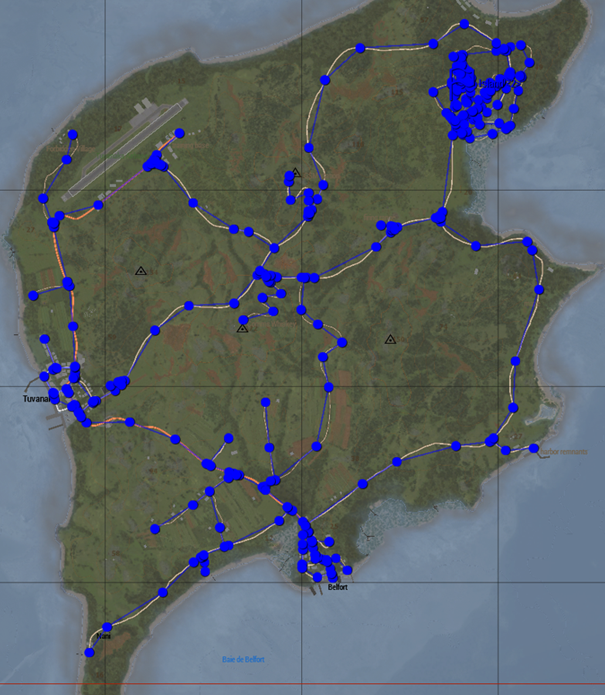
Usually, these assets are more than enough to populate a full map. When more markers are needed, orient yourself on the naming conventions of the already existing markers. Getting the naming right is crucial, as the markers otherwise are not recognized by the code which in the best case simply doesn’t work and in the worst case crashes the complete mission.
When placing the markers for airports, outposts, seaports, factories and resources make sure that the main markers are large enough to cover the whole area you want to assign to them. For the vehicle and mortar markers, they are usually placed within the area of the main marker. The hangar as well as the helipad marker are only necessary, when there is a helipad or hangar outside of the main marker area and you still want to use it for said main marker. When not needed after completing the map port, the unused markers can simply be deleted.
There are no set rules on how markers should be placed but here a few rules-of-thumb based on experience which create to a somewhat balanced map.
Have at least 3 airport. If there are not enough airfields, build custom ones with for example helipads and such. Make sure that the airfields are somewhat equally spread over the map.
Use logical and organic bottlenecks as well as advantageous positions to place outposts like near major road crossings, elevated positions, near larger cities or somewhat close to factories.
Have resources and factories spread more or less equally over the whole map. Ideally you want to use a 1-4 to 1-7 ratio of factories to resources as factories are multipliers to the income of resource points.
Don’t fill the whole map to the brim but leave gaps for the rebels to place the HQ. Players prefer dead ends or somewhat protected areas to place their HQs.
Don’t cluster too many markers on a too close space. This can lead to areas with too much AI which decreases FPS whilst also creating a situation in which the players can be completely overrun by AI for a prolonged time aka certainly less fun.
Once the mission is completed in the editor, save the mission, do not binarize the file and copy the mission.sqm over into the map folder.
Setting up the mapInfo.hpp
Setting up the mapInfo.hpp
class
In the first line, enter the mapname before the opening bracket.
population
Enter the config names of cities and villages with the population like {"configname",amount} separated by commas.
disabledTowns
Enter config names of cities and villages that should be disabled. For example when there are is a city marker in the middle of an airfield like { "city1", “city 2”}.
antennas
Here enter the coordinates from all antennas on the map.
antennasBlacklistIndex
Here enter the incides of antennas in the array that should not be active. Array starts at 0.
banks
Enter the coordinates from all available bank buildings.
garrison
Enter the named of the markers that should be hold by the invaders. The second bracket contains all markers whilst the fourth bracket only contains the control markers.
fuelStationTypes
Enter the active fuel station types based on the assets being used on the map. Best way here is to copy the fuel stations from a map using the same buildings.
climate
Enter the climate of the map from the selection arid, temperate, tropical, arctic.
Integration into the system
Integration into the system
config.cpp
mapInfo.hpp
NavGrid.hpp
Once that is done, you made no mistakes and you built and loaded Antistasi properly with the mods necessary to run the map you ported, the mission should appear in the list.